0 comments

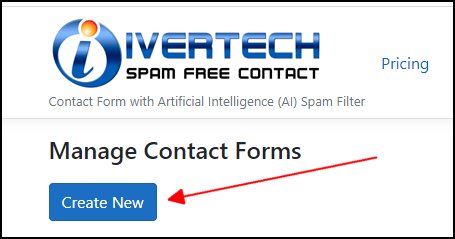
After creating an account with Ivertech Spam Free Contact, you will need to create a new contact form. You can do so by clicking on the "Create New" button after you have logged in:

CreateNewContactFormButton.jpg


You can play around with the font style, color, size, etc. and see the effect immediately on the right-hand side. 

CreateNewContactForm

You can also specify if you would like to enable Captcha on the form.  If you enable Captcha, the user will need to check the “I’m not a robot” check box before he/she is allowed to submit the form. 

You can modify the field names if you like.  For example, you can overwrite the “Name” field to “Company Name”.  Or you can change it to "Nombres" if you would like to use Spanish for the field.  Besides the 4 standard fields (Name, Email Address, Subject, and Message), you can also add additional custom fields if you like.  You can do so by clicking on the “Add Fields” link at the bottom:

AddNewFieldInContactForm.jpg

You can name your field anything you like (“Telephone Number” for example).  If you check the “Is Required Field” check box, your customer will not be allowed to submit the form unless he/she provides the information requested.  You can just leave the check box unchecked if it’s an optional field.

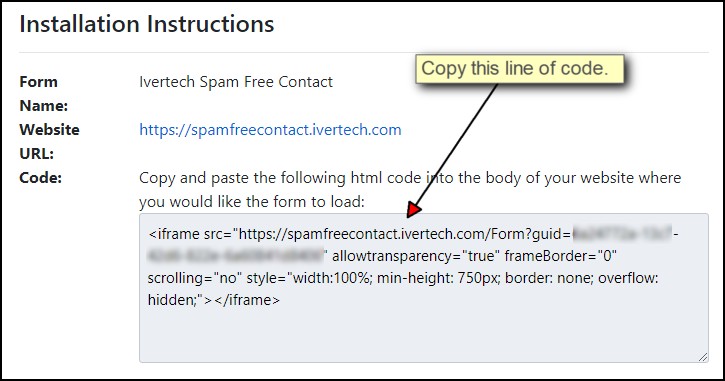
Once you are satisfied with the layout of your form, you can save it by clicking on the "Save" button on the top right corner. You will then be provided with instructions on how to embed the contact form:

Installation.jpg 

You can copy the html code and paste it to your web page, if you have one available.  If you don't have a web page yet, you can just copy the URL and paste it to your browser to see how the form looks like.

Once you are done setting up the form, you can proceed to test it by following these simple steps to test it.


5 comments

If you are getting spam messages from Weebly’s contact form, you can try adding a reCAPTCHA to it.  This will make it more difficult for spam bots to submit spam messages.

Below are a few simple steps to add reCAPTCHA to your Weebly contact page:

1) Go to your Contact page and drag the Contact Form widget onto your page:

image

2) Once the widget has been placed on the form, click anywhere on the form and then click on “Form Options”. Turn on Google Captcha (by clicking on the circle so that it’s moved to the right) and then click on “Save”:

image

3) Click on the Publish button on the top right corner and proceed to view the Contact page using a new incognito window:

image

4) Please note that you can either use a new incognito window or clear your browser’s cookie in order to test the Contact page.  If you don’t do so, you won’t be able to see the Google Captcha.  Weebly will just allow you to submit the contact form without having to prove that you are a human.

5) Also, you will not see the regular “I’m not a robot” checkbox when the form first loads.  Instead, you will need to fill out the fields and then click on the “Submit” button in order to trigger the reCaptcha challenge:

image

6) Your message will only be submitted if you have successfully solved the challenge questions.

While adding a reCAPTCHA to your Weebly contact form will stop most of the spam bots from submitting spam messages, it will not stop actual humans from manually submitting spam messages. You can use Ivertech Spam Free Contact for Weebly to filter out spams submitted by humans using Artificial Intelligence.

0 comments

Tired of getting spammed from the Contact Us page at Weebly.com?  Just follow these simple steps below to spam-proof your Contact Us page:

1) Open a free account at Ivertech Spam Free Contact.

2) Create a new contact form and copy the installation code:

3) Log on to your Weebly.com site and click on the Edit Website button:

image

4) Click on Pages on the top, then click on Contact on the left:

image

If you don’t have a Contact page, you can create one by clicking on the “+” icon next to the Pages section.

5) Click on the Build tab on top and drag the “Embed Code” block and drop it onto the middle of your Contact page:

image

6) Once the “Embed Code” block has been dragged and dropped to the page, click on it and then click “Edit Custom HTML”:

image

7) Paste the installation code that you copied earlier into the text box:

image

8) Once the code has been pasted into the text box, click anywhere outside the text box and you will see the contact form that you created on Ivertech Spam Free Contact:

image

9) Click on the “Publish” button on the top right corner and proceed to view the Contact page:

image

10) Here's how you can test your contact form.

0 comments

If you are getting spam messages from Wix’s contact form, you can try adding a reCAPTCHA to it.  This will make it more difficult for spam bots to submit spam messages.

Below are a few simple steps to add reCAPTCHA to your Wix contact form:

1) Go to your Contact page and click on the form.  Click on Add New Field, Anti Spam, and reCAPTCHA:

image

2) Once the reCAPTCHA field has been added to your form, make sure that it’s placed at the bottom (before the Submit button):

image

3) Publish the site and test the contact page.

4) If you click on the Submit button without checking the “I’m not a robot” checkbox, you will get a prompt that says “Please check this box if you want to proceed”:

image

While adding a reCAPTCHA to your Wix contact form will stop most of the spam bots from submitting spam messages, it will not stop actual humans from manually submitting spam messages. You can use Ivertech Spam Free Contact for Wix to filter out spams generated by humans using Artificial Intelligence.

0 comments

Tired of getting spammed from the Contact Us page at Wix.com?  Just follow these simple steps below to spam-proof your Contact Us page:

1) Open a free account at Ivertech Spam Free Contact.

2) Create a new contact form and copy the installation code:

3) Log on to your Wix.com site and click on the Edit Site link:

image

4) Click on the “Menus & Pages” icon on the left and click on “Add Page” at the bottom:

image

5) A new page called “New Page” will be added for you.  Change it to something friendlier like “Contact Us” and click on the “Done” button:

image

6) Click on the “+” icon on the left, “Embed”, and “HTML iframe”:

image

7) Click on “Enter Code” and paste the installation code that you copied earlier into the text box and click “Apply”:

image

8) Once the installation code has been applied, you will see the contact form, which is partially displayed:

image

9) Resize the edges of the rectangle so that the entire contact form is visible:

image

10) Click on the “Publish” button on the top right corner and then click on “View Site”:

image

11) You should see the contact form when you click on the “Contact Us” link:

image

12) Here's how you can test your contact form.